SIEM Integration
Overview
SIEM (Security Information and Event Management) is a key part of the overall security framework of organizations. It is essential to feed the required security information from enterprise applications into SIEM to monitor and manage security events across the enterprise.
Saviynt Enterprise Identity Cloud (EIC) generates audit logs that record all actions performed by a user such as changes to SAV roles, global configurations, and connections. These audit logs include the following entries: OBJECT TYPE, OBJECT NAME, ACTION, ATTRIBUTE, ACCESS BY, ACCESS TIME, IP ADDRESS, and MESSAGE. For more information see, Managing Application Audit Logs.
If you are creating Elasticsearch-based analytics records, you can view and export logs for these records either from the EIC user interface or you can ingest the logs into your SIEM solution by using the fetchRuntimeControlsDataV2 API. If you are creating non Elasticsearch-based analytics records, you can ingest the logs into your SIEM solution by using the fetchRuntimeControlsDataAPI.
Supported Versions
| Software | Version |
|---|---|
| Saviynt | Release v2021.0 (fetchRuntimeControlsDataV2 API is supported from this version) Release v5.5 SP3 (Runtime V2 analytics feature is supported from this version) |
Reference Architecture
The following diagram illustrates the components involved in the integration and the communication between EIC and the SIEM application.
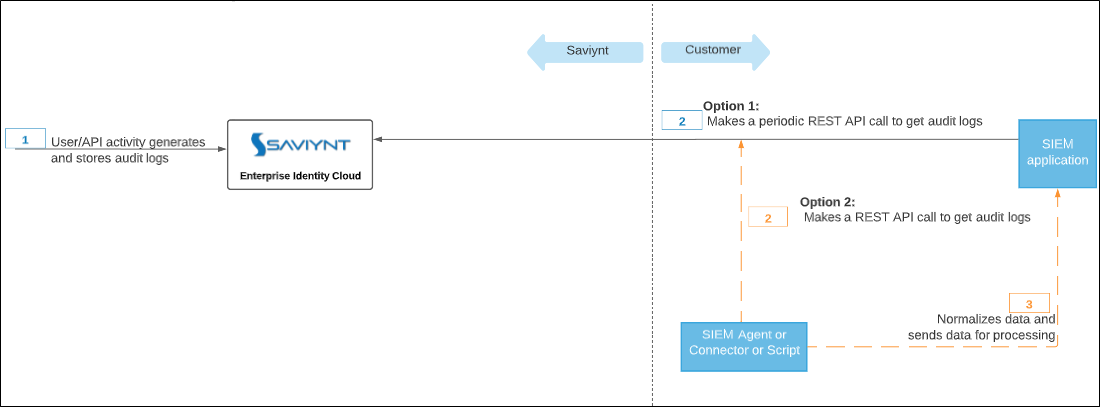
You can use one of the following options to generate and obtain data from EIC:
Option 1: REST-based integration
In a REST-based integration, the following actions occur:
- User/API activity generates and stores the audit logs.
- The SIEM application makes a REST API call to directly obtain the audit logs.
Option 2: Non REST-based integration
In a non REST-based integration, the following actions occur:
- User/API activity generates and stores the audit logs.
- The SIEM agent, an out-of-the-box event connector, a custom script, or an automation script makes a REST API call to obtain the audit logs.
- The SIEM agent, connector, or script normalizes the data and sends it for processing.
Understanding the Steps to Generate and Obtain Audit Logs
This section provides high-level details about the configuration steps that you need to perform to generate and obtain the audit logs.
Step 1: Creating an Analytics Record
Create a new runtime analytics control (V2) using an SQL query. For more information, see Creating Elasticsearch-based Analytics Controls (Version 2). While creating an analytics control, copy the following query in the Analytics Query parameter.
select ua.TYPEOFACCESS as 'Object Type',
     ua.ActionType as 'Action Taken',
     u.username as 'Accessed By',
     ua.IPADDRESS as 'IP Address',
     ua.ACCESSTIME as 'Event Time',
     ua.DETAIL as 'Message'
from users u,
     userlogin_access ua,
     userlogins l
where l.loginkey = ua.LOGINKEY and
     l.USERKEY = u.userkey and
     ua.AccessTime >= (NOW() - INTERVAL ${timeFrame} Minute) and
     ua.Detail is not NULL
Step 2: Setting up Permissions
Saviynt recommends that you create a dedicated user with least privileges required to call the Saviynt fetchRuntimeControlsDataV2 API to obtain the audit logs. For example, you can associate a ROLE_ADMIN SAV role or a custom SAV role with required permissions to the user to call the API.
Perform the following steps to set up permissions:
- Create a user, for example, siem-sid. For more information, see Creating Users.
- Change the password for the user. For more information, see Administrator Functions.
- Create a SAV role, for example, ROLE_SIEM.
- Assign permissions to the newly created SAV role.
- Assign the permission to access the web service URL of the Saviynt fetchRuntimeControlsDataV2 API. For more information, see Understanding the SAV Role Parameters.
- Assign the permission to verify the analytics record that you created. For more information, see Understanding the SAV Role Parameters.
- Associate the SAV role with the user created in Step1. For more information, see Understanding the SAV Role Parameters.
Note: If you want to associate the ROLE_ADMIN SAV role with a user, you need not perform steps 4a and 4b.
Step 3: Invoke the Saviynt API
EIC maintains an audit log of all security activities performed by a user within Identity Repository. You can send these logs to your SIEM application by using the Saviynt fetchRuntimeControlsDataV2 API.
Perform the following steps to create a REST-based integration with the SIEM application:
- Invoke the authentication API to obtain the authorization token to make a REST API call.
Method: POST
Endpoint:{{url}}/ECM/api/login
Syntax used in the API URLs:{{url}}/ECM/{{path}}/apiName
Example:{{url}}- https://example.saviyntcloud.com{{path}}- Useapi/v5for Release v5.2 onwards andapifor older versions of the product.
Body:{"username":"admin","password":"password"}
For more information about the request and response details, see the Saviynt REST API documentation. To check if you have passed the details correctly, refer to the below sample screenshot taken from the Postman tool.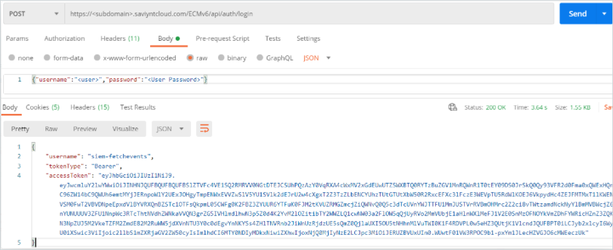
- Invoke the fetchRuntimeControlsDataV2 API to fetch data.
Method: POST
Endpoint:{{url}}/ECM/{{path}}/fetchRuntimeControlsDataV2
Body:{"analyticsname": "<Analytics Name>","attributes": {"timeFrame": "<INTERVAL in minutes>"}} - Ensure that you add the following in the body of the API:
For more information about the request and response details, see the Saviynt REST API documentation.Variable Details analyticsname Specify the name of the analytic control created in Step 1: Creating an Analytics Record.
To check if you have passed the details correctly, refer to the below sample screenshot taken from the Postman tool.

Sample Log Messages
In EIC, audit logs are generated in the JSON format. The following table describes the fields shown in the audit log:
| Field | Description |
|---|---|
| Action Taken | Action performed by the user for the selected object type. Example: Create, Update, Delete, Show |
| Message | Details about the event. |
| IP Address | IP address of the user who performed action. |
| Object Type | Name of the object or module on which the action is taken. Example: SAVROLE, Job Control, Global Configurations, Connections. |
| Accessed By | Name of the user who performed the action for the selected object. |
| Event Time | Time stamp of the action. |
The following topics provide examples of audit logs that will help you analyze the response you receive from the REST API.
Add a SAV Role to a User
Sample response:
{
  "Action Taken": "Update",
  "IP Address": "xx.xxx.xx.xx",
  "Event Time": "2022-02-07 10:34:37",
  "Message": "{\"data\":\"rolekey:14, bpowner:21, allusersofloggedmanager_length:5\",\"message\":\"SAV Role: ROLE_CERTIFIER updated by user admin, added users User1\"}",
  "Object Type": "SAVROLE",
  "Accessed By": "admin"
}
Remove a SAV Role from a User
Sample response:
{
  "Action Taken": "Update",
  "IP Address": "xx.xxx.xx.xx",
  "Event Time": "2022-02-07 10:34:37",
  "Message": "{\"data\":\"tab:users, rolekey:14, myDataTable1_length:15, euserkey:21\",\"message\":\"SAV Role: ROLE_CERTIFIER updated by user admin, removed users User1\"}",
  "Object Type": "SAVROLE",
  "Accessed By": "admin"
}
Create a Security System
Sample response:
{
  "Action Taken": "Create",
  "IP Address": "xx.xxx.xx.xx",
  "Event Time": "2022-02-02 11:49:57",
  "Message": "{\"data\":\"externalConnection:, passwordManagementConnection:, accessAddWorkflow:AOBAutoApproveWF, defaultSystem:false, provisioningConnection:, firefighteridWorkflow:, serviceDeskConnection:, remoteHost:xx.xx.xx.xx, displayName:Securitysystem1, actionUri:/securitysystems/save, removeServiceAccountWorkflow:0, instantprovision:false, objectType:SECURITY_SYSTEM, manageEntity:false, hostname:, USERLOGINS_KEY:com.saviynt.ecm.utility.UserLogins : 34270, provisioningcomments:, useopenconnector:false, policyRule.id:, proposedAccountOwnersworkflow:, firefighteridRequestAccessWorkflow:, reconApplication:true, remoteAddress:xx.xx.xx.xx, eventId:1643802596788, automatedProvisioning:false, persistentData:false, systemname:Securitysystem1, provisioningTries:, actionType:Create, accessRemoveWorkflow:AOBAutoApproveWF, policyRule:id:, port:, addServiceAccountWorkflow:0\",\"objectName\":\"Securitysystem1\",\"message\":\"Security system Securitysystem1 createdby user test-admin\"}",
  "Object Type": "SECURITY_SYSTEM",
  "Accessed By": "test-admin"
}
When a Job Trigger is Deleted
Sample response:
{
  "Action Taken": "Delete",
  "IP Address": "xx.xxx.xx.xx",
  "Event Time": "2022-02-03 13:59:12",
  "Message": "{\"data\":\"actn:9, trigger_name:SuccessionManagement, job_name:CampaignDeprovisioningJob, job_group:Attestation, trigger_group:GRAILS_JOBS, _:1643896726380\",\"objectName\":\"Attestation:Campaigndeprovisioningjob:Successionmanagement\",\"message\":\"User admin removed trigger: SuccessionManagement for job: CampaignDeprovisioningJob of group: Attestation\"}",
  "Object Type": "JOB_CONTROL",
  "Accessed By": "admin"
}
Permissions Required for SIEM Integration
- Log in to EIC.
- Navigate to Admin > SAV Roles. Alternatively, enter SAV Roles in the search box and select the required menu item. For more information, see Using the Unified Navigation. The SAV Role List page is displayed.
- Click Create SAV Role. The Create Sav Role dialog box is displayed.
- Select the Create New option to create a new SAV role. The Create SAV Role page is displayed.
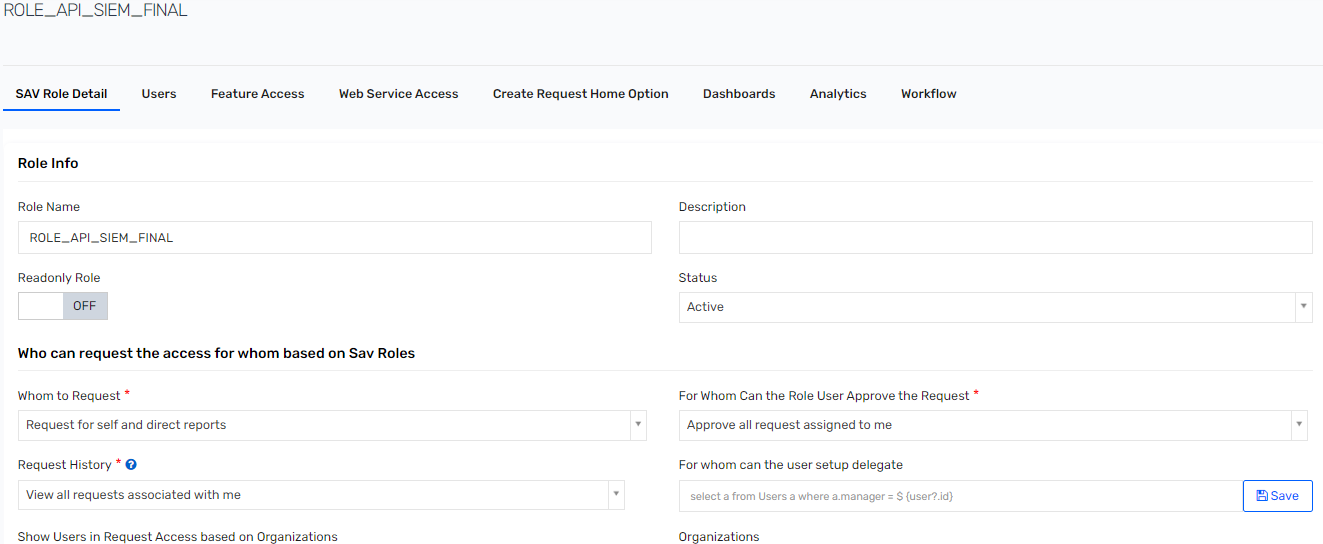
- Specify the following parameters:
- Role Name: Specify the name to identify the SAV role.
- Description: Specify the description for the SAV role.
- Whom to Request: Select as Request for self and direct reports.
- For Whom Can the Role User Approve the Request: Select as Approve all request assigned to me.
- Click Create. The SAV Role details are displayed as shown below:
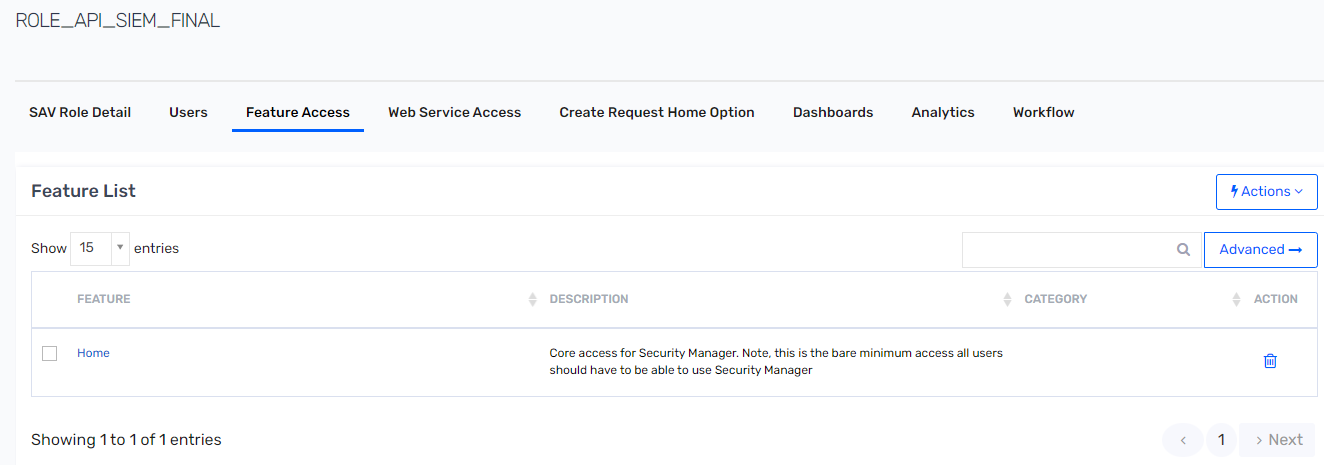
- Click Feature Access.
- Click Actions and select the Home access.
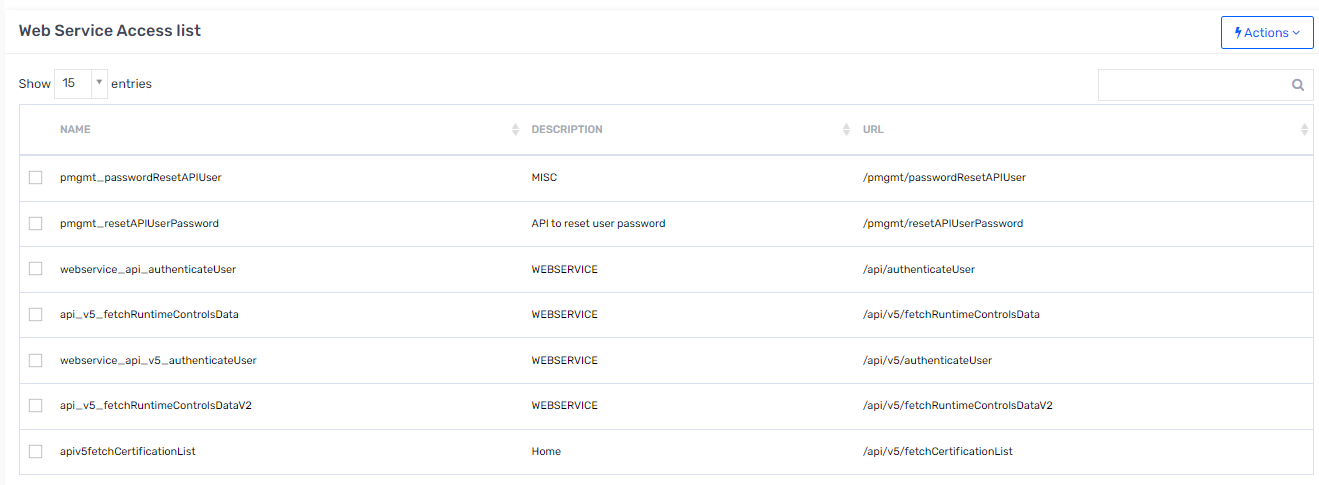
- Click Web Service Accessx .
- Click Actions and select the following accesses:
webservice_api_authenticateUserapi_v5_fetchRuntimeControlsDatawebservice_api_v5_authenticateUserapi_v5_fetchRuntimeControlsDataV2
Note: The
webservice_api_authenticateUserandapi_v5_fetchRuntimeControlsDataaccesses are required only if you have created a non Elasticsearch-based analytics record.
For more information about the steps to select these permissions, see Understanding the SAV Role Parameters.